Showing posts with label sewing. Show all posts

Monday, July 30, 2007

My baby sister's getting married!

So I finished the shawl at long last, then vanished into the ether. Not so: I've been incredibly busy getting ready! I had more things to make before the wedding. Like ties for the boys. Really run to make, and so much nicer than anything we found while shopping.


And a purse for me. The purse is a bit special: the black fabric came from a jacket that belonged to my grandma who died when I was only five, the pin is hers as well, and the green silk I made into a dress for another wedding (and Dan helped me pick out the fabric back when we were just friends). I love how it came out.


Oh, and here's the dress I'll be wearing on Friday afternoon. It has a corset back and oh, my, I feel so elegant and special in it. Dan's eyes light up when I try it on, too. I had to hem it quite a bit (the perils of being five foot one), but now it fits like a dream.

All of this preparation has a purpose: to help my sister finally marry the man of her dreams. She's all grown up now at thirty five, but to me she'll always be my baby sister, partner in crime, queen of hide and seek, the one I told my secrets to. These past few weeks have been a blur between knitting the shawl and preparing for our trip out to California to be there when she gets to marry her best friend. I couldn't be happier for her or more excited for what life has to bring her way.

We're leaving first thing in the morning and won't be back until Sunday, hopefully with pictures!

Saturday, July 07, 2007

My apron got to Canada!

My apron swap buddy, Tara, has been having several not so good things going on in her life lately. I'm so glad the apron got there and cheered her up a bit - she loved it! So now, of course, I can share pictures.

I went to the fabric store, looking for something Asian themed and colorful. Already had the pattern (Butterick 4945), which I was going to play with a bit. This geisha fabric jumped out and said, "pick me!", so I had no choice. Then I looked all over for a good contrast fabric and found some subtly patterned deep blue that went really well.

I used the contrast fabric for the neck ties, figuring it would frame the neckline really well. Also added contrast pockets to give it a little oomph:


Contrast ties on the back (like the lovely ironing board dress form?):


Here's a closer look at the fabric. Now if I only knew what it read in Japanese...

Wednesday, June 13, 2007

I am such a tease

Do not be distracted by the peaceful, sleeping cat. This picture is only present to obscure the fact that there is yet again no visual crafting content of any kind. No updates on the almost Cobweb Crepe Shawl, no crafts with the boys, not even a lone picture of something tasty. I've been a bit busy. Work, getting into bunker mode for Summer (the boys have their last day of school tomorrow.....wish me well and send chocolate), and a secret project. I just finished making an apron for the May Apron Swap over at One Hour Craft. Now, since the swapee and I know each other and I know she reads this blog (and I read hers), we both agreed not to post about the aprons until after everything got over to each other in the mail. Spoils the fun to see pictures ahead of time, you see. But, but, it's so cute! I want to talk about it! So here are the details: it's made out of fabric, it has many colors, there was thread involved, also use of my sewing machine, pins, an iron, and scissors. Oh, and a pattern. Can't you just picture it? One more hint: the fabric is cotton. Pictures....eventually.

In the meantime, if you blog, knit, and live anywhere near Portland, Oregon, go here and comment. Bobbie is working feverishly on putting together a Portland Knit Bloggers group, which should be huge and full of talented, nice people (like Bobbie herself).

Thursday, May 10, 2007

Finally caught up on sleep

...since I finished the beaded mat! It was down to the wire, but I finished right before leaving for the bridal shower. My sister cried happy tears, so all the hours I spent working on this were worth it. I had the hardest time capturing what the beads and the pearls looked like - the smaller beads sparkled caught the light, while the larger pearls just glowed. The smaller pearl beads were actually from my wedding dress - a bit of something old (and good!) to add to her new life as a couple.

Whew - the beading is finished! I ironed, but many of the wrinkles just wouldn't come out. Proof that it's hand made, I say.
Satin laid out on a pre-cut mat, then trimmed down to size.
Edges glued down to the inside and outside. This took quite a bit of pulling and re-arranging to make sure the beads stayed centered on the mat. I used an acid free glue stick with a pretty heavy hand.
Up against my wall - this is the best picture I got of the completed mat. Sorry about the lighting - it was a really cloudy day. I wanted to get a picture of the mat uprightl, a bit like it will look with a picture and a frame on the outside. I tried to design it so it could hang in any direction since my sister doesn't exactly have her wedding pictures yet.
Close up of the vines and flowers. I really like how the grayish beads accent the pearls and the ivory colored satin. The overall look was very old fashioned, like something made in another era. May have to do *one* more beaded project for myself. There are beads left over, after all...

Thursday, May 03, 2007

Half way there

Let's not talk about how many hours I spent trying to thread a needle about the size of a hair, or about how many beads fell off into the couch or onto the floor yesterday. Or about how many tiny needle holes there are in my fingers right now. Or about how late I was up last night trying to sew down that last strand of shiny glass bits. None of that matters. I'm half way there! If I really work today and tomorrow, I should have the beading done in time for my trip to California. Sleep? Sleep is for sissies.

Wednesday, May 02, 2007

Beading progress

I'm done with one of the four sides and I'm really pleased with how the mat is looking over all. It's a really cloudy day today so lighting is lousy - sorry for the poor photograph. It's hard to capture the sparkle of the tiny beads in any light, especially with such subtle color variations. Back to the grindstone. I need to get this finished by Sunday, so there are many hours of staring at a tiny needle and coaxing itty bitty beads out of containers still ahead of me. Wish me luck!

Tuesday, May 01, 2007

Secret project revealed

Remember this? My sister was so wistful and sad that she wouldn't be getting any beaded love that I had to do something. I'm already making a shawl for her wedding, so a wrap wouldn't work. Tried to think of something she could use, something that wouldn't get stuck in a box and looked at possibly once a year. I thought and thought, and then the idea came. My sister loves pictures and scrap booking and is very sentimental in general. Why not make a beaded mat for a picture frame? The beading would stay under glass, so no dusting (I cringed at the thought of a beaded frame that would gather dust and dirt constantly), and it would be something she could enjoy every day. Perfect! With a bit of help from her good at being sneaky fiance I got the future wedding picture size and off I went. I'm in the middle of insane beading at the moment that has to be finished by Friday afternoon (her shower is this Sunday and I'm flying out to California for the weekend), so hopefully more details soon. In the meantime, a few pictures to tide everyone over.

Friday, March 02, 2007

Pictures

All right, I promised lots of pictures. Here's a good start. Back in December, my sister called to ask if I would be willing to make up a wrap for a friend of hers who was getting married in February. I answered back with a bunch of questions: what kind of thing did this friend want? How much was she planning on spending? What did the wedding dress look like? Most importantly, was she very picky? I had nightmares of a bride in California unhappy with every tiny thing I did and the nightmares that could possibly ensue. My sister assured me that her friend was very laid back and would be incredibly happy with anything I made.

I talked to the friend and tried to narrow things down a little bit. She sent me pictures of her dress (seen here) and said she wanted something satin-ish with beading that hit around the waist. Off to the fabric store for swatches, since I couldn't really tell exactly what color the dress was via the link or her pictures. I found some likely candidates and sent them off so she could pick something that would work well. Meanwhile, I tried to see what the beading looked like on the dress so I could echo it somewhat. My sister came to the rescue here when she visited in January - we found the exact dress at a store, so I got a good look at it. Yay! That helped a lot when I went to design the pattern.

I wanted something that would coordinate with the dress and look similar in the detailing, so I took the vines and leaves pattern and started drawing. I used graph paper so the end result would be symmetrical and penciled in vines and drawing the individual beads until I liked the overall design. Then I stitched the sides of the wrap together and placed the pattern under one layer of fabric, tracing the lines with an air erase pen. I machine stitched over the lines with a silver thread veeeery slowly, since the thread snags and breaks very easily. I learned to use larger stitches and re-thread pretty often.

Then I started beading. Here's where I should mention that I've never done this kind of work before. I have sewn larger beads onto fabric and I've done cross stitch and needlepoint and all kinds of find hand sewing, but this was all new to me. When I went to the bead store I had no idea what the different beads were called or what to use to sew them on - all I knew was what was on the dress. The nice lady at the bead store walked me through finding the right kinds of tiny beeds (seed beads?), I learned that the crystal beads I wanted were "fire polished", and found out that freshwater pearls are actually not that expensive (good, because they really made the wrap). When I told her what I was attempting, she paused, then very carefully said "...well, that's quite ambitious" thinking, I'm sure, something more along the lines of "that woman is insane."

The beading took a long time and was very exacting. The needles used for beads this fine are unbelievably tiny - so small, the eye of the needle is barely large enough to fit the insanely narrow beading thread through. After a while I got the hang of threading the needles and got into a groove of following the silver stitching with a narrow line of tiny beads, then adding a lone pearl in the center of each leaf. The pearls got double stitched as they are a bit heavy. I beaded and beaded and beaded, dipping my needle into a wee bowl of tiny silvery bits to gather up more as I went, until my distance eyesight would get a bit blurry. Lather, rinse, repeat.

Finally I was done (cue angel's voices here) and stitched up the ends of the wrap, then hand stitched the remaining opening. I ever so carefully ironed it, packed it in tissue, and sent it off, hoping the bride to be would like it.

My sister went to the wedding and told me her friend loved the wrap. Evidently people kept coming up and commenting on it, and several people asked if my sister was going to get a wrap like it for *her* upcoming wedding. Well, no. I am making an heirloom lace shawl, which is just as cool and is exactly what my sister asked for (more on that later). But I noted a bit of regret in my sister's voice when she told me this, so I have something special planned as a bridal shower gift. More on that later, too.

Tuesday, October 31, 2006

Happy Halloween!

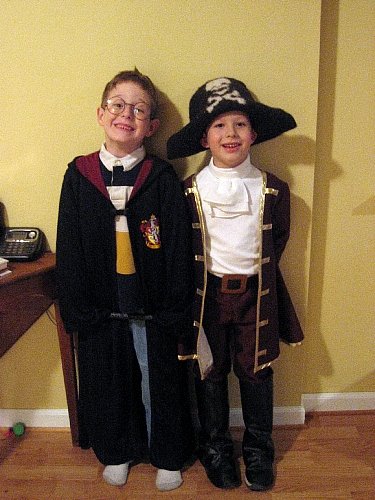
Sorry I've been a bit absent in blogging. Busy, busy week here with Special Education meetings, evaluations, much last minute sewing, and getting the house ready for guests. At least I was able to finish Arden's Pirate costume in time. He loved every detail, from the jabot down to the fake boot covers to the hat (which he wears all the time right now). Ryan opted for a Harry Potter look with no scar ("too scary") and had a blast waving his wand around at anyone nearby.

Trick or Treaters were everywhere tonight. Grown-ups huddled together at the end of each driveway, waiting for excited ghosts and princesses and zombies to get their candy. One house was covered in orange lights, spiderwebs, gravestones, and ghosts. At another house, a man had a telescope out and helped each child take a look at the stars. But I think the best treat tonight may well have been this tiny bit of paper that the boys barely noticed.

Thursday, August 24, 2006

More domesticity

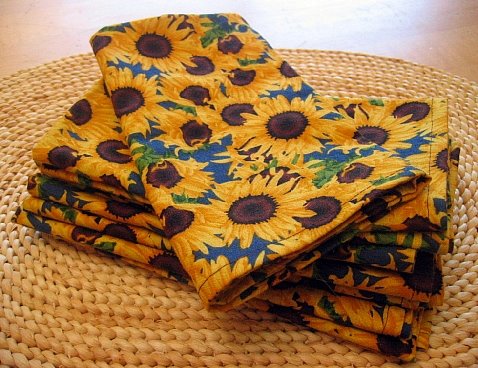
Care to guess what those are? Napkins, baby! Realized that the boys should probably be using something other than shirt sleeves (or the occasional toy) to wipe their mouths and spills after meals. However, the thought of buying package after package of paper napkins just to toss them after each use seemed really wasteful. And expensive. Yes, I'm just that frugal.
So off to the fabric store I went, in search of something that would look cheerful on our new (to us - I heart Craigslist) dining table. Oh, and all cotton. Washable and practically indestructible would also be nice. Finally found this fabric in with the quilting bolts. Something about the sunflowers and the bright, sunny print called out to me.

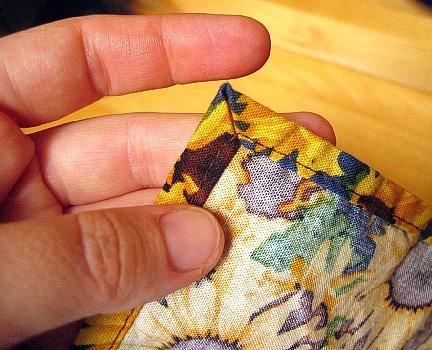
Making them up was pretty simple, if a bit boring. Wash fabric (always, always wash fabric before cutting anything out - you take care of a lot of unpleasant surprises this way). Meanwhile, make a square template - in my case, I used printer paper taped together and cut out to 17 by 17 inches. Cut out as many squares as you can using the template. Now, I wanted to miter the corners. Look up above - see? Nice and neat. I could have used this method, but it was far too persnickety for simple 1/4 inch hems. I did something more like this - just folding down each edge, ironing, then cutting the very tip diagonally across and stitching the whole thing down at once. It's not perfect, but just fine for an everyday napkin, at least to my mind.

I made a dozen, which seemed to take forever but more likely took a bit over an hour or so. The only thing I don't like about these is they're a little on the small size for my taste. Next batch I make will end up 17 1/2 inches after hemming, which seems about right. Cause of course I need some fancier ones, right? Hopefully I'll get those done before Sunday - we're having a housewarming party and I'd love to have cloth napkins for everyone if possible.

Wednesday, July 06, 2005

Why is it I always finish projects at midnight?

I was pondering this last night....oh, around midnight. My sister leaves for China tomorrow morning, so I wanted to get her gift ready so Dan could drop it by after work today. I started this a week ago, then set it down as I did other things. I've got *lots* of time, I kept telling myself. Finally realized on Sunday that I did not have much time left, especially since there were other things I needed to do this week besides sewing like a mad fiend.

Enter in Kathy's patented midnight sewing spree. Usually saved for the night before Christmas or perhaps an important birthday, but useful any time there just aren't enough hours in the day to finish something. Who needs sleep, anyway? I close the door of the closet so Dan
doesn't hear the sewing machine and go to town*. I think my best creative thinking is done late at night when everything is quiet and I can get really into a project with no distractions. Either that, or I tend to procrastinate a wee bit.

First, here's the finished messenger bag, complete with goodies**:
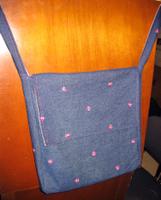
The denim
fabric was left over from trivets my sister made for her classroom volunteers at the end of the school year. There are tiny hot pink flowers here and there, and I topstitched with matching pink thread that you can't see in the crappy middle of the night picture. The lining I found for $2 a yard back in the bargain section of Joanns. I love me a good cheap fabric hunt - there always seems to be something that will work back there, and the price soothes my frugal soul. There are pockets for magazines, pens, scissors, decks of cards, and a special pocket for her plane ticket (a real, honest to goodness printed ticket - in 2005!) hidden behind the magazines. I tried to get a shot of the inside with all the pockety goodness, but it came out really, really bad. Trust me here.

Next come the goodies:
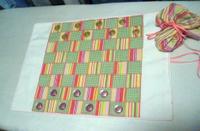
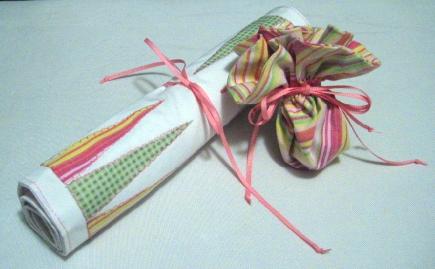
That's a portable game board with backgammon on one side, checkers on the other. Beside it is a pouch full of pink and yellow buttons to use as markers. I used a narrow pink grosgrain ribbon to tie both.

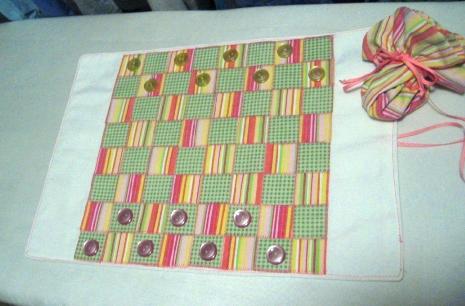
Checker board
:
This started out well and ended up being a huge pain. I ironed fusable web to the two colors of fabric then cut out 64 squares, all 1 1/4 inches per side. So far, so good. Then I placed them on the muslin backing and ironed them down, alternating stripe sequences. Things were looking good at this point. Then I started to stitch down the edges with a narrow zigzag of pink thread. Ploink! Broken thread. Grumble, rethread, keep on going. Ploink! Another broken thread. This time I noticed that there was goo of some sort building up on the needle, which was pulling on the thread and breaking it. Allrighty, I'll just keep the needle clear of adhesive gunk. No problem. Ploink! Evil, evil web with plasticy stuff that makes sewing impossible. Grumbling quietly so as not to wake Dan, I carried on. Took forever, or quite close to it. I won't say how many times the thread broke, other than it was too damn many times. But the end result looked really good, so I'm not complaining. Much.

Backgammon board:
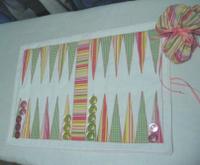
I love how this came out. Had a hard time figuring out what to do for the center bar since I didn't have a third fabric. Then I realized that turning the stripes would make a nice contrast. By this time I knew all about the adhesive issue and went to find another stitch that wouldn't pick up as much of the nasty stuff in the first place. Blanket stitch to the rescue! The needle would only dip into that evil pool of goo every 3 stitches. As long as I kept clearing off the needle, it went just fine. Some topstitching and a ribbon tie, and the game board was done.

There are a ton of things I'd change about the bag and the game board, but they came out really well, especially considering I made it all up as I went along. It was done in time to send along with Dan this morning, and I think my sister will like the colors and get a lot of use out of all of it. I got a pattern out of it, so sewing up the next one should be much easier. Oh, and today I find out about Sewer's Aid, which keeps residue off the sewing needle so nothing jams up. Why didn't anyone tell me about this YESTERDAY? Agggh.

* Yes, I sew in my closet. It's HUGE - you could easily put a twin sized bed in there and make it a room, although the sloped ceiling would make getting around tricky. Perfect for my sewing machine, serger, fabric, yarn, the occasional small furry animal....
** Please forgive the truly crappy pictures. Note that they were taken in my closet at midnight.